Just as you can use Font Awesome font icons for premium member badges, you can also use them for any permission circle badges, or activity level badges (instead of titles).
For purposes of this tip, we will be creating a badge for Activity Level Titles, which can be set via Recipes.
First, select the font icon you want from the FontAwesome list of icons, here.
Note that while the Solid and Brands icons are free to use, Regular, Light, and Duotone require that you purchase a Pro license.
Let's assume that I've chosen to use a star as my badge, and I want the number of stars to increase based on activity levels. I want three levels: 2 stars for 5 points, 3 stars for 15 points, and 4 stars for 30 points. Also, I want the stars to be red.
If you already have Activity Levels set, you can just edit them to copy the stars into the field, and move onto the CSS below. Otherwise, keep reading...
Next, go to Recipes, and click "Add Recipe".
From the templates available, under "Kudos", choose "Recognize Member Who Reaches Point Milestone."
Choose a name for your Recipe (I used "2 stars for 5 points".)
Enter the number of points required for a member to hit your first Milestone (from the example, that would be 5) in the Points Milestone field.
There are already two actions set for you: to record an Activity Stream Event, and to send an email to the member. You can keep those and adjust, if you like, or you can remove those actions.
Click "ADD ACTION", and from the popup, choose "Set Activity Title".
Go to the Font Awesome list referenced above, and copy the actual star icon from that list () and paste it in the Set Activity Title field. When you paste it, keep in mind that it's a special character, so it won't look like what you copied. It will look like this:
Click "Create Recipe".
Now you'll create a recipe for each of your other milestones, copying the star and pasting it as many times as you need it.
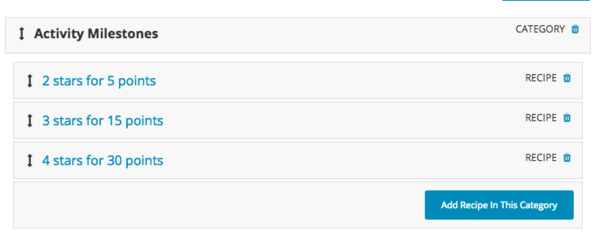
And here's what my Activity Milestones Recipes look like in my control panel:

Before you add your CSS, you'll need to identify the class names for your titles. To do that, you'll need to go to a page where your new titles show (a member's profile page, for instance), and inspect the element where it is in use (DOM inspector or view source) to determine the CSS class. Look for .h-member-activity-title, and make sure to get the "hash" after that, such as .h-member-activity-title-ef8085ef8085, which represents the title with two stars. Crowdstack generates a "hash" if there aren't any alphanumeric characters, and "ef8085" is the hash that was generated for our star.
Now, go to Display Settings, and you'll use this CSS in the Custom CSS field:
/*Member activity badge: use Font Awesome */
.h-member-activity-title-ef8085ef8085, .h-member-activity-title-ef8085ef8085ef8085, .h-member-activity-title-ef8085ef8085ef8085ef8085 {
display: inline-block;
color: red;
font-family: 'Font Awesome 5 Pro' ;
text-rendering: auto;
-webkit-font-smoothing: antialiased;
-moz-osx-font-smoothing: grayscale;
transform: translate(0, 0);
}
You can see that I have referenced each of my activity levels , and designated the color of the icon.
Here's what it will look like:
You can do the same thing for a permission circle badge. Instead of using .h-member-activity-title in your CSS, you'll reference the ID of the permission circle, and use .h-member-badge-<ID number>, which you can find in the URL of the permission circle details. You would copy and paste the icon into the Display Badge field of that permission circle.


